
Structural Fiberglass, Epoxy, and Composites
Unthickened West System Epoxy hast a syrup-like consistency.
This page is dedicated to all things structural epoxy, including fiberglass. Epoxy is a wildly useful material that has all kinds of uses on boats. It is very strong, waterproof, workable (it is roughly the consistency of maple syrup out of the can), but can be thickened using fillers up to a peanut butter consistency when your project calls for structure out of the mix. Some epoxies (penetrating epoxies) are available that have a water-like consistency. Epoxy cures to a rigid, semi-clear (some aesthetic epoxies dry to a clear state), that has excellent bonding ability; especially when thickened with an additive appropriate for bonding (such as West System 403).
Epoxy can be used for an extremely wide variety of uses on a boat. It can bond, gap fill, repair fiberglass, repair wood, fill fared voids, the uses are essentially endless. I’ve even used it to repair sink drains that cracked and where leaking.
Note that epoxy is susceptible to UV damage. In the sun, it eventually turns brown and becomes brittle. Any epoxy exposed permanently outside should be painted with a UV resistant paint.
This page is written featuring West System’s 105 system epoxy, simply because I think that it’s the best epoxy system available for DIY boaters. It is readily available at nearly any marine supply store (and many hardware stores), available in many sizes that are conveniently organized in correct ratios (size A, size B, and - less common - size C). It is reasonably priced for boaters doing DIY work. West System offers a wide variety of other products that support their epoxy line and also offers product support online and through their tech support line (866-937-8797) - all from a company that has a vast knowledge and history of marine-specific epoxy applications.
General Resources
West System US Tech Support Hotline, US: 866-937-8797
West System Boat Repair Manual
This PDF is West System’s comprehensive boat repair manual. This is a fantastic reference that I reference often. It details many repairs/projects such as bedding hardware, fixing loose rudder bushings, repairing rotting fiberglass core, etc.
https://www.westsystem.com/instruction/epoxy-basics/applying-fiberglass-cloth-tape-2/
West System Epoxy - Applying Fiberglass Cloth and Tape
West System is probably the most trusted name in epoxy boat building. They are a second-to-none resource when it comes to anything related to structural epoxy and fiberglass on boats.
https://www.westsystem.com.au/detailed-repairs/
West System Detail Repair Guides - Guides from West System covering common boat repair jobs.
Normal Epoxy (West System 105) vs. G/Flex (toughened Epoxy)
Boat Builder Central
https://boatbuildercentral.com/ - Epoxy, polyester, glass cloth, and all kinds of other boat building supplies under one roof.
https://boatbuildercentral.com/support-tutorials/Tutorials/epoxy-resin-fiberglass-and-tools.pdf
Fiberglass resin and tools writeup from Boat Builder Central
Safety
West System’s material safety data sheets are located here: West System MSDS.
Cleanup
Normally, when we’re talking projects, cleanup goes last. With epoxy, cleanup goes first. Everything about epoxy is unbelievably sticky; the resin, the hardener, and the finished mixture. Epoxy is so sticky that you’re almost guaranteed to get epoxy all over your work area and tools during a session. The good news is that epoxy components and the mixture itself clean up with very readily available solvents: rubbing alcohol, acetone, or lacquer thinner. It’s a very good idea to have some cleanup solvent and rag available any time you’re working with epoxy to clean up spills, accidents, oopsies as they happen. I keep a couple rags pretreated with rubbing alcohol on standby. It’s much easier to cleanup stray epoxy right after the spill happens.
West System Epoxy Material Properties
West System has detailed material properties data on their website, located here: West System Material Properties.
Material Compatibility
Epoxy will stick to almost any material - including itself, with a few exceptions (polyethylene plastics, grease/silicone grease/bond-breaking waxes). It will still to existing fiberglass layups that used polyester or vinylester resins, making it an ideal fiberglass boat repair material. It will bond to metals.
Polyester/vinylester-based products will NOT stick to epoxy. Be sure to account for this when considering future fiberglass layups over and epoxy-based repair. Gel coat (a polyester-based product) won’t stick to epoxy. Paint over epoxy with an epoxy-based paint (there are many to choose from).
Always use good prep practices when relying on epoxy to make a structural bond. Clean the area with a desgreaser. Sand the surface with coarse-grained sandpaper. Finally, clean it with a solvent that is safe for the substrate material (I often use isopropyl alcohol) to remove any dust, grease, or other contamination.
Product Selection

This diagram, published by West System, makes it easy to choose the epoxy, hardener, and additives you need for your project.
Resin/Hardener
When you source from my affiliate links, you support the American Mainsail Knowledge Base.
Epoxy is a two-part system. Resin and hardener. West System epoxy is mixed in a 5:1 ratio of resin:hardener.
Resin
West System Epoxy is available in several different sizes. I have linked to size A containers below, which will work for most small-medium size epoxy projects.
West System 32 oz. Epoxy Resin: Amazon Affiliate Link West Marine Affiliate Link
Be sure to include hardener in any resin order.
Tools
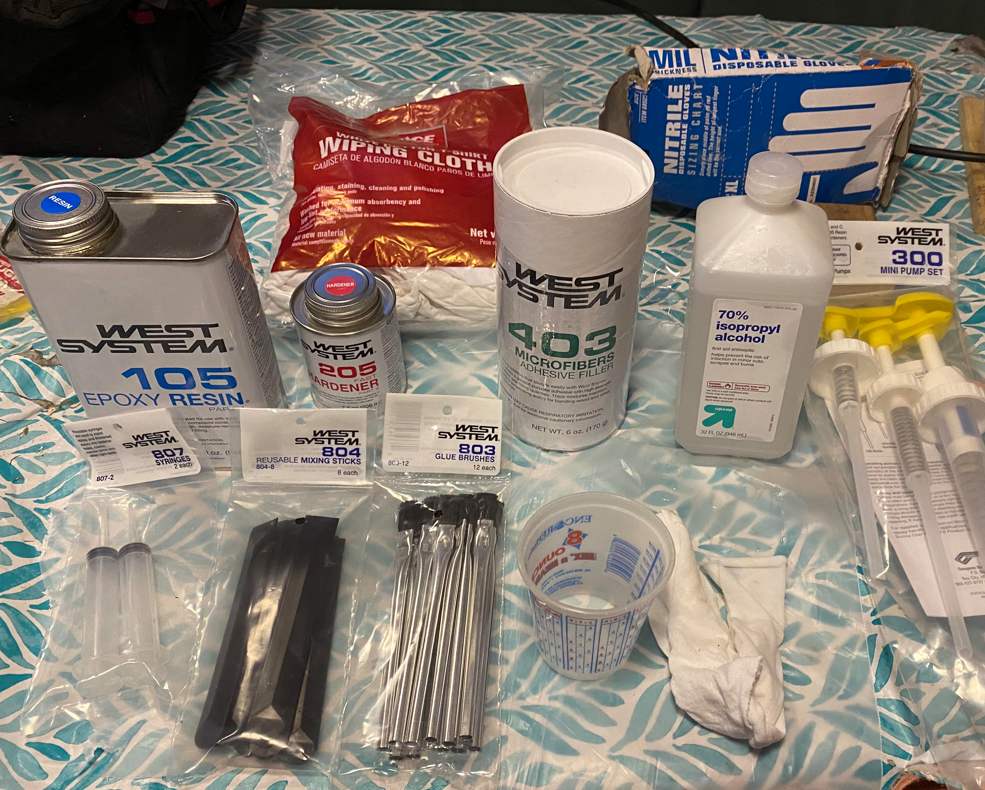
Common tools many epoxy projects need: Epoxy resin and hardener, additives/thickeners (as needed), dispensers, mixing cups, mixers, disposable gloves, cleanup cloths and solvent (alcohol), brushes and syringes (if necessary), polyethylene (basically standard) plastic drop cloth. Make sure to use ear and lung protection, as needed.
Mixing
West System is mixed at five parts resin, one part hardener. Read below for helpful tips on mixing.
It is very important that you mix epoxy resin and hardener in the correct ratio. You can measure resin:hardener ratio each time you mix, or use West System’s very convenient mixing dispensers offers a pump kit that automatically dispenses the correct ratio of resin:hardener in each dispenser pump. The pumps are reusable. When I’m working with epoxy, this is how I mix it. It makes the process of working with epoxy much more convenient. One pump of resin and hardener makes 1 oz. of mixed epoxy.
West System Dispenser Pump: Amazon Affiliate Link West Marine Affiliate Link
Note: the downside of the dispenser pumps is that the stems get covered in epoxy and hardener. Make sure to have plenty of cleanup material (alcohol, paper towels or rags) when taking the stems out of the epoxy and hardener containers. To save epoxy and hardener, you can remove each pump and “dry pump” it back into the container. This will pump the residual epoxy/hardener that remains in the pump.
Since the pumps are prone to a bit of a cleanup mess, it can be helpful to be equipped with small, graduated measuring cups if you’re only mixing up a small amount of epoxy. Reminder: West System is mixed at five parts resin to one part hardener. Notice that the mix and measure cups I’ve linked to already have graduations for mixing 5:1. When you buy mixing cups, stock up on them. They are super helpful to have around for a variety of boat maintenance jobs.
Each batch of epoxy requires very vigorous resin/hardener mixing before it’s ready for application. West System suggests mixing each batch of resin and hardener for at least one minute.
West System offer disposable mixers that are ideal for mixing epoxy. They’re stiff and fairly wide, allowing you to scrape the sides of the container for resin that might be stuck to the sides. They also have a square edge and a round edge for forming fillets. Amazon Affiliate Link West Marine Affiliate Link
Popsicle sticks will generally work for mixing as well.
West System offers calibrated measuring cups for measuring resin and hardener. Amazon Affiliate Link West Marine Affiliate Link. Epoxy won’t stick to them, so they are reusable.
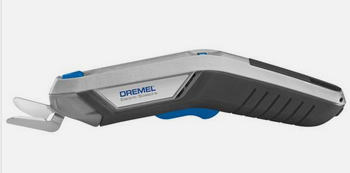
Power cutters can save all kinds of time when cutting fiberglass cloth
Fiberglass Tools
Electric power shears can be extremely helpful for making fast and accurate cuts in fiberglass cloth. Depending on the amount of fiberglass you’re planning on cutting, I would recommend spending more money for better cutters if you’re taking a bigger project. Cutters that offer replacement blades are a bonus.
https://amzn.to/3T2mIt8 Dremel Electric Scissors (Amazon affiliate link)
https://amzn.to/48nFrnd Cheaper Option - Pink Power (Amazon affiliate link)
Fiberglass Reinforcing
West System carries a range of fiberglass reinforcing cloth for fiberglass epoxy work. Because of epoxy’s higher bond strength (and overall superior material properties) compared to polyester or vinyl-ester resin, epoxy is ideal for general fiberglass boat repairs or new parts where strength and toughness is important.
Resources
West System Fiberglass Reinforcement
Boat Builder Central - Epoxy and Fiberglass Basics
Boat Builder Central - Wetting out Fiberglass Video
Fillers and Additives
West System offers a variety of additives/thickeners. All aim to thicken the epoxy in order to make it more workable, but modify the cured epoxy’s properties for different purposes. Here’s a rundown:
High-Density (Structural) Fillers

West System’s Filler Guide from their product literature.
These fillers are intended to be used for structural gap filling, bonding, and laminating. Due to their high-density, structural nature they are difficult to sand, but can be lightly sanded for finishing.
403 Microfibers - Fine microfibers. Often used for bonding wood together. Good penetrating and gap filling capability. Best for laminating.
404 High Density - Maximum physical adhesive properties for hardware under cyclical loading. Offers the strongest bond, good for making structural gap fills and/or structural fillets.
405 Filleting Blend - Cures to a dark brown. Used for making fillets when working with wood and/or wood joint bonds.
406 Colloidal Silica - Literally tiny glass spheres. West’s most versatile epoxy filler, great for general purpose bonding and filleting. Can be used to increase strength, abrasion resistance, and consistency. Can be added to epoxy mixes treated with low-density fillers to add strength to these fairing compound mixes.
Low-Density Fillers
Low-Density fillers decrease the density of the finished epoxy, making it more sandable for more finishing/asthetic control.
407 Low-Density Fairing Filler - Creates a fairing putty when added to epoxy for an easily sandable, carvable final surface.Used in general fiberglass repairs for a final fairing layer. Can also be used for architectural or auto body repairs.Cures to a dark red/brown color.
410 Microlight Fairing Filler - Creates an ultra sandable surface for working with high area applications. Used in general fiberglass repairs for a final fairing layer. Can also be used for architectural or auto body repairs. Cures to a tan color. Not recommended for use under dark paint or surfaces exposed to high temperatures.
aMINE bLUSH
When working with epoxy when an aesthetic result is desired, it’s important to understand amine blush. Amine blush is discoloration that forms on the surface of cured epoxy as a result of the amines in the epoxy reacting with moisture in the atmosphere during curing. It is easily removed with water and a Scotch-Brite pad after the epoxy is cured.
For more about amine blush, see this link:
Vacuum Bagging
Vacuum Bagging Resources
https://www.youtube.com/watch?v=85EltazjQvI&list=RDCMUCi9E1Hne0eutZHTEVnMTZ0Q&start_radio=1
Expeditions Evans Vacuum Bagging Experiment
A great way to follow along with Brett and Jade as they experiment with vacuum-bagging structural fiberglass in preparation to build their fiberglass hard dodger/bimini shelter. This video shows the vacuum bagging process in its most basic form.
Bulk Epoxy Gap Filling
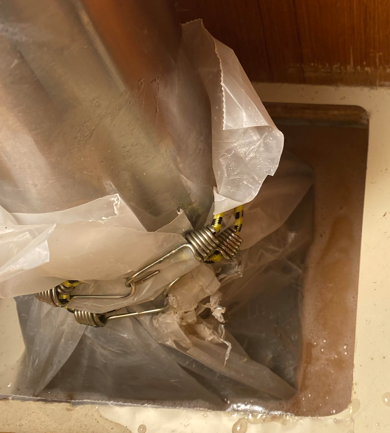
Gap pouring epoxy under a sailboat mast for a strong, durable gap fill. Epoxy won’t stick to polyethylene sheet, so the bottom of the mast was wrapped to prevent the epoxy from bonding to it. The mast was centered using its four fastening bolts (underneath the sheeting) that were coated in silicone grease, which epoxy also doesn’t bond to.
Structural epoxy can be used as a structural gap filler (a material to take up space in a void), but you need to use a lot of caution when using epoxy for this purpose. When too much epoxy is curing in the same place, heat can build up, making the reaction occur too quickly. When this happens, the epoxy is experiencing thermal runaway, called “cooking” or “going exothermic”. This will generally make the epoxy brittle, and the pour can even crack. Smoking emanating from the pour is evidence of thermal runaway occurring.
There are several ways to reduce chances of thermal runaway: use West System’s (or a competing manufacturer’s) slow hardeners, use a mineral-based filler (like West System 404) to slow the reaction and reduce the amount of active epoxy in the pour, and, if possible, use bulk materials in the pour in order to take up space (such as wood, foam, or other core products).
When using epoxy as a gap filling/bulk pour material in larger quantities, it’s important to discuss your project with the epoxy manufacturer. West System has a fantastic technical support line and can help guide you through your specific project.
Epoxy is an extremely sticky material. When gap filling between horizontal surfaces requiring the epoxy to flow between them, care should be taken in order to encourage the epoxy to flow into the gap. It’s best not to use any thickeners, warm the epoxy and hardener to >70° for good flow-ability, and tap or vibrate the outside of the form to encourage the epoxy to flow. In extreme situation where gaps are small, it is probably best practice to use penetrating epoxy, which has a water-like consistency.

A large sailboat structural floor repair done with West System epoxy.
The floors (structural beams that run transverse to the hull) of this sailboat were rebuilt with West System Epoxy and custom cut, oak cores. The tops of the existing floors were cut off with a multi-tool cutter (a super handy tool to have for working with composites). Rotten material was removed with pry bars, an electric chain saw, and various other chisels. Custom, solid oak cores were made that served as new coring material that would provide strong compression strength for bearing the huge mast loads of this large sailboat. West System epoxy was used to gap fill the void between the walls of the floors and the oak core, using the vertical fiberglass walls of the existing floors as forms. The result is the new core and vertical fiberglass of the existing floors became solid, composite pieces. Fiberglass was then laminated over the top of each floor to close the new floors in. After a little paint, these floors looked like new and were certain to provide more strength and durability than new.
Heat management was key for curing the epoxy in this project. So much epoxy curing in one place can make temperatures go out of control quickly.
Cold Weather Epoxy Curing
Resources
https://www.epoxyworks.com/index.php/cold-weather-bonding/
Curing epoxy in cold weather < 60° is generally frowned upon by manufacturers. In the Northeast, US, I’ve found that sometimes, when epoxy projects need to be done in the off-season, we don’t have much of a choice. There are a few techniques that can be used to cure epoxy in less than ideal conditions.
Warm the epoxy resin, hardener, and any additives/thickeners you might be using before pouring to 70° or better.
Use fast hardeners (West System 205). Fast hardeners will create more heat, allowing the epoxy to cure better in cold environments.
Pick a week when it will be above freezing for at least five days, preferably getting into the mid 40’s-50’s °F during the day. Don’t pour epoxy during that cold snap!
Build a tent around the curing area using plastic drop cloth/sheeting. Warm the inside of the tent with an incandescent light bulb. Be careful to keep the plastic and any other flammable material away from the light bulb.
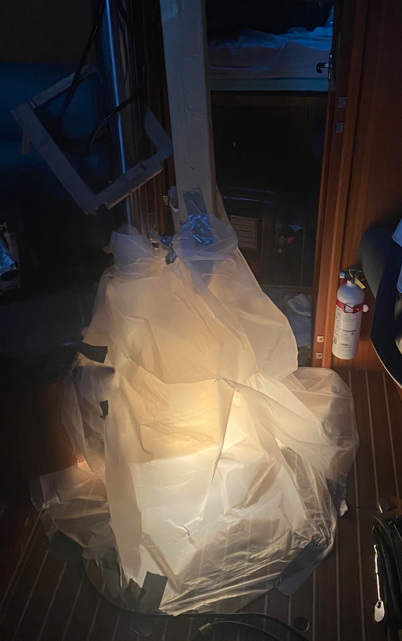
Not a winter night lawn decoration. I made this curing tent that’s warmed with a 40 watt light bulb to keep temps above 40° while curing a bulk pour.